Tracking motion of video objects
The Track Motion feature allows you to track the motion of a point or area in a video and automatically generate a tracking path in the process.
Track Motion works in tandem with the Match Motion feature. Match Motion allows you to make your overlays and titles automatically follow the tracking path that you create.
If you prefer to manually animate overlays and titles to match your main background video, you can use the Customize Motion feature.
Motion Tracking interface basics
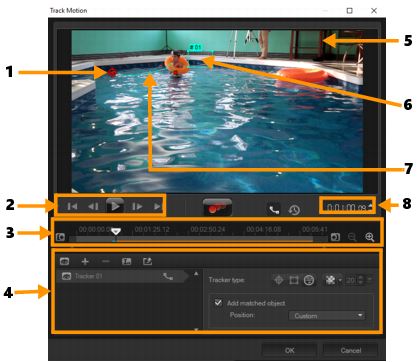
Track Motion dialog box
Part | Description |
1 — Tracker | Specifies the object being tracked to create the tracking path. This can also appear as an area depending on the selected tracker type. |
2 — Playback Control | Buttons that control video playback. |
3 — Timeline Control | The Video Timeline along with zoom and track in/out controls. |
4 — Tracker Control | Buttons and options that let you control the properties of the trackers, tracking paths and matched objects. |
5 — Preview Window | Shows the current video being played. |
6 — Matched object | Where the matched object is placed. |
7 — Tracking path | The path of the motion tracked by the program. |
8 — Timecode | Lets you jump directly to a specific part of the video by specifying the exact timecode. |
Track Motion buttons and options |
| Track Motion — Tracks the motion of the selected tracker in the video clip automatically. |
| Reset to default position — Discards all actions. |
| Track in / Track out — Specifies a working range in the video clip where motion is tracked. |
| Zoom in / Zoom out — Adjusts your view of the Video Timeline. |
| Show tracking path — Shows or hides the tracking path in the Preview Window. |
| The eye on each tracker indicates its status. When enabled, an open eye appears and the tracker is visible in the Preview Window. When disabled, the closed eye appears and the selected tracker is hidden. |
| Add tracker / Remove tracker — Adds and removes trackers |
| Rename tracker — Renames the active tracker |
| Save to path library — Saves the active paths to the path library. |
| Set tracker as point / Set tracker as area /Set multi-point tracker— Lets you choose a single tracking point, a set tracking area, or a dynamic multi-point area. |
| Apply/hide mosaic — Applies a mosaic effect over the tracked object. This button lets you blur the area of the tracked object. You can choose a rectangular or circular mosaic. |
| Adjust Mosaic size — Lets you set the size for the mosaic pattern |
| Add matched object — Adds a matched object and lets you adjust the position from the Position drop-list or the Preview Window. |
| Cancel — Closes the Track Motion dialog box and discards any changes made on the video. |
| OK — Closes the Track Motion dialog box and keeps the path tracked as a video attribute. |
To launch the Track Motion dialog box
• You can do one of the following:
• Select a video file on the Video Track and click the
Track Motion button

on the
Toolbar.
• Click Tools > Track Motion and choose a video file.
• Right-click a video clip on the Video Track of the Timeline and choose Track Motion.
To track the motion of video objects
1 Click Tools > Track Motion.
2 Browse for the video that you want to use and click Open. This opens the Track Motion dialog box.
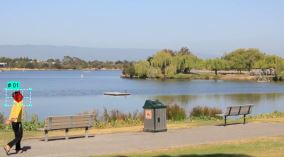
In this example, a video of a boy walking by the lake is selected.
3 Drag the tracker to the part of the video that you want to track.
In the example, the tracker is dragged to the face of the boy. The area is magnified to give you a closer view of your selection.
4 In the Tracker type area, choose one of the following trackers:
• Set tracker as point (default)

— lets you set a single tracking point.
• Set tracker as area 
— lets you set a fixed tracking area. This gives you a larger sample area but also lets you set the boundaries for a Mosaic blur. You can adjust the shape and size of the tracker by dragging the corner nodes.
• Set multi-point tracking 
— lets you set a dynamic tracking area that adjusts in size and shape as the object moves closer or further from the camera or changes angles. Drag the four nodes to the inside edges of the area that you want to track. This type of tracker automatically applies a Mosaic blur. For more information see
To blur parts of tracked objects.
5 Click the
Track Motion button

.
The video is played as the tracking path is generated. If Show tracking path is selected, the tracking path is displayed and highlighted once the tracking process is completed.
6 Click OK.
It is easier to track points or areas in your video that are distinctly in contrast with other video elements. Avoid choosing pixels that may blend with similar pixels in the video.