Exploring the workspaces
Corel VideoStudio Pro consists of three main workspaces, and a Welcome tab.
• Capture
• Edit
• Share
Each workspace contains specific tools and controls to help you accomplish the task at hand quickly and efficiently.
For more information about the
Welcome tab, see
The Welcome book.
You can customize the size and position of the elements on your screen for full control of your editing environment. For information about using a custom workspace layout, see
Customizing the workspace.
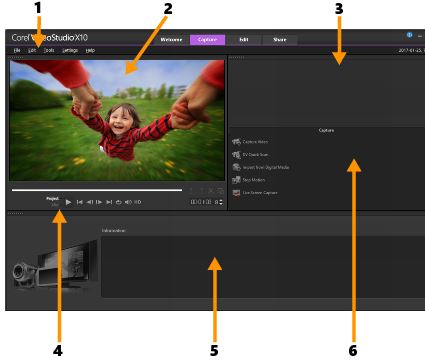
The Capture workspace
Media clips can be recorded or imported directly to your computer's hard drive. This step allows you to capture and import video, photo, and audio clips.
The Capture workspace consists of the following components:
1. Menu bar — provides various commands for customizing Corel VideoStudio, opening and saving movie projects, working with individual clips, and more.
2. Preview Window — shows the current video being played in the Player panel.
3. Library panel — a storage depot for captured media clips.
4. Navigation area — provides buttons for playback and for precision trimming in the Player panel.
5. Information panel — lets you view information about the files you are working with.
6. Capture Options — displays different media capture and import methods.
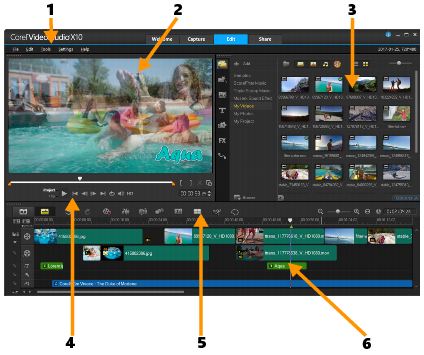
The Edit workspace
When you open Corel VideoStudio Pro, the Edit workspace appears as your default workspace. The Edit workspace and the Timeline are the heart of Corel VideoStudio Pro, where you can arrange, edit, trim, and add effects to your video clips.
The Edit workspace consists of the following components:
1. Menu bar — provides various commands for customizing Corel VideoStudio, opening and saving movie projects, working with individual clips, and more.
2. Preview Window — shows the current video being played in the Player panel.
3. Library panel — a storage depot for everything you need to create a movie, including sample video, photo, and music clips, and your imported clips. It also includes templates, transitions, titles, graphics, filters, and paths. The Options area opens in the Library panel.
4. Navigation area — provides buttons for playback and for precision trimming in the Player panel.
5. Toolbar — lets you choose from a variety of functions related to content in the Timeline.
6. Timeline panel — The
Timeline is where you assemble the media clips for your video project. For more information, see
Timeline.
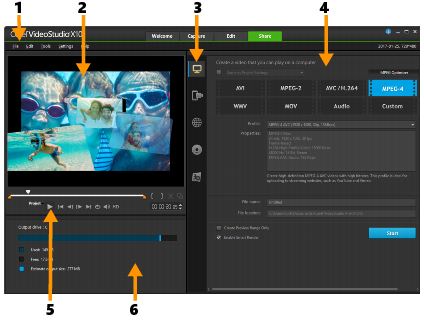
The Share workspace
The Share workspace lets you save and share your finished movie.
The Share workspace consists of the following components:
1. Menu bar — provides various commands for customizing Corel VideoStudio, opening and saving movie projects, working with individual clips, and more.
2. Preview Window — shows the current video being played in the Player panel.
3. Category selection area — lets you choose between Computer, Device, Web, Disc, and 3D movies output categories. For HTML5 projects, you can choose HTML5 and Corel VideoStudio project.
4. Format area — provides a selection of file formats, profiles, and descriptions. For Web sharing, it displays the settings for your account.
5. Navigation area — provides buttons for playback and for precision trimming in the Player panel.
6. Information area — lets you view the information about the output location and provides an estimate of the file size.