Adding and editing chapters
This feature is available only when the
Create menu option is selected. By adding chapters, you can create submenus linked to their associated video clip. When you add chapter points to your VideoStudio project, these are automatically converted to disc menu chapters. For more information, see
Adding cues and chapters.
You can create up to 99 chapters for a video clip.
Represented as a video thumbnail in a submenu, each chapter is like a bookmark for a video clip. When viewers click a chapter, the playback of the video will start from the selected chapter.
If the Create menu option is not selected, you will be guided to the preview step immediately without creating any menus after clicking Next.
When you are creating a disc with only one VideoStudio Pro project or one video clip, do not select Use first clip as introductory video if you want to create menus.
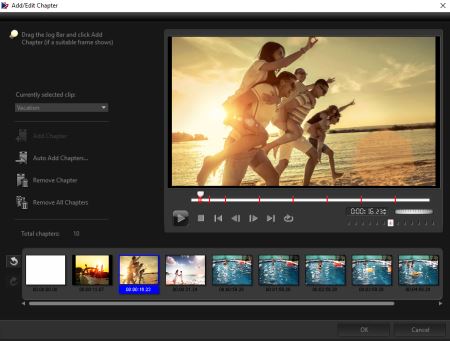
To create or edit chapters linked to a video clip
1 Select a video in the Media Clip List.
2 Click Add/Edit Chapter.
3 Drag the Jog Slider to move to a scene that you want to set as a chapter point, and click Add Chapter. You can also click Auto Add Chapters to let VideoStudio Pro automatically select chapters.
Note: If you want to use Auto Add Chapters, your video must be at least one minute long or the video has scene change information.
4 Repeat Step 3 to add more chapter points.
5 Click OK.
You can also use Remove Chapter or Remove All Chapters to delete unwanted chapters.
If you click Auto Add Chapters and your video is a DV-formatted AVI file, the program automatically detects scene changes and add chapters accordingly. For MPEG-2 files, the program uses the scene change information to automatically generate chapters.
Creating disc menus
Disc menus allow viewers to easily navigate through the contents of a disc and easily choose the specific parts of the video to watch.
In Corel VideoStudio, you can create disc menus by applying menu templates and editing them to suit the requirements of your projects.
To apply a menu template
1 Select Create menu in the 1 Add Media page and click Next. This takes you to the 2 Menu & Preview page.
2 In the Gallery tab, click the menu template thumbnail to apply it.
To apply layout settings to other menu pages
• Click Layout Settings in the Edit tab and select Apply to All Pages of this Menu.
To add background music to menus
1 Click the
Set the background music button

in the
Edit tab and choose from a menu of options for selecting an audio file to be used as background music.
2 In the Open Audio File dialog box, choose the audio file to use.
Note: Click the
Set audio properties button

to adjust the duration of your audio and apply fade in and out effects.
To add background image or video to menus
1 Click the
Set the background button

in the
Edit tab and choose from a menu of options for selecting an image or a video file to be used as background image or video.
2 In the Open Image File or the Open Video File dialog box, choose the image file or the video to use.
To add motion menus
1 Select Motion menu in the Edit tab.
2 Adjust the duration of the video thumbnail by setting the number of seconds in Duration.
Note: Using motion menus increases the file size. Check the disc space usage indicator and the Required menu space value to make sure that the file size remains within the limits of your selected output.