Using Audio Ducking to automatically adjust volume
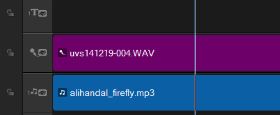
Audio ducking (similar concept to side-chaining) is used to automatically lower the volume of one track so that you can hear another track better. For example, if you have a video project that includes music and voiceover, you can use audio ducking to automatically decrease the music volume when the narrator is speaking. You can adjust the threshold that triggers “ducking” and you can adjust by how much the volume of the background track will drop.
To use Audio Ducking
1 In the Timeline view (Edit workspace), ensure that the track you want to apply “ducking” to is below the video, overlay, or voice track that you want to feature.
2 Right-click the music track that you want to “duck” and choose Audio Ducking.
3 In the Audio Ducking dialog box, adjust the following sliders:
• Ducking Level — determines the volume decrease. Higher numbers indicate lower volume.
• Sensitivity — determines the volume threshold (read from the track above the selected track) required for ducking to occur. You will likely need to readjust the Sensitivity slider to achieve the results you want.
• Attack — determines the time it takes to lower the volume to the Ducking Level setting after the Sensitivity threshold is met.
• Decay — determines the time it takes to return to the regular clip volume from the Ducking Level
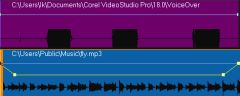
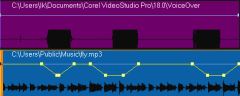
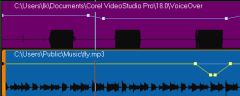
In these examples, the voiceover is the purple track and the music is the blue track. The yellow line in each example indicates when and by how much the volume of the music track is lowered by applying different Sensitivity settings for Audio Ducking: Top = 0, Middle = 2, and Bottom = 30. In this example, a setting of 2 worked best.
You can tweak Audio Ducking results manually by dragging, adding, or removing keyframe nodes on the yellow volume line.