Trimming a clip
The best part of editing your movie on your computer is the ease with which you can split and trim your clips with frame accuracy.
To split a clip into two
1 In Storyboard View or Timeline View, select the clip you want to split.
2 Drag the Scrubber to the point where you want to split the clip.
Note: Click

or

to set the cutting point more precisely.
3 Click

to split the clip into two clips. To remove one of these clips, select the unwanted clip and press
[Delete].
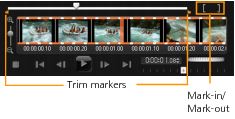
To trim a clip with the Trim markers using Single Clip Trimmer
1 Double-click a video clip in the Library or right-click on a video clip and choose Single Clip Trim to launch the Single Clip Trim dialog box.
2 Click and drag the Trim markers to set the Mark-in/Mark-out points on the clip.
3 For more precise trimming, click on a Trim marker, hold it, and use the left or right arrow keys on your keyboard to trim one frame at a time. The Mark-in/Mark-out points can also be set by pressing [F3] and [F4], respectively.
4 To preview the trimmed clip only, press [Shift + Space] or hold [Shift] and click the Play button.
Note: You can also use zoom controls to display each frame of your video on the Timeline and trim one frame at a time. The Scroll Bar makes navigating through your project quicker and easier. A wheel mouse can also be used to scroll, and to zoom by pressing [Ctrl].
To trim a clip directly on the Timeline
1 Click a clip on the Timeline to select it.
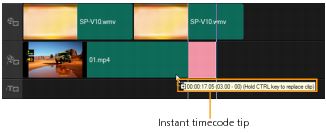
2 Drag the Trim markers on either side of the clip to change its length. The Preview Window reflects the position of the Trim marker in the clip.
Note: Instant timecode tip is a feature of Corel VideoStudio that allows you to add clips with a specific timecode. It appears while trimming and inserting overlapping clips on the Timeline, enabling you to make adjustments based on the timecode shown. For example, the instant timecode tip appears with the format 00:00:17.05 (03:00 - 00). 00:00:17.05 indicates the current timecode where the selected clip is located. The (03:00 - 00) start-end range represents the duration of one overlapping clip with the previous clip and another overlapping with the next clip.
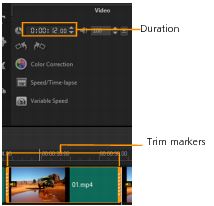
To trim a clip using the Duration box
1 Click a clip on the Timeline to select it.
2 Click the timecode in the Duration box in the Options Panel and enter the desired clip length.
Note: Changes made in the video Duration box only affect the Mark-out point. The Mark-in point remains unchanged.