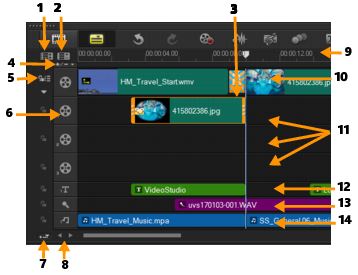
Part | Description |
1 — Show All Visible Tracks | Displays all tracks in your project. |
2 — Track Manager | Lets you manage the tracks visible in the Timeline. |
3 — Selected range | Displays a color bar that represents the trimmed or selected part of a project. |
4 — Add / Remove Chapter or Cue | Lets you set chapter or cue points in your movie. |
5 — Enable / Disable Ripple Editing | When enabled, clips maintain their relative positions when a clip is added to the track. For more information, see Using Ripple Editing. |
6 — Track buttons | Shows / Hides individual tracks. |
7 — Automatically scroll Timeline | Enables or disables scrolling along the Timeline when you preview a clip that extends beyond the current view. |
8 — Scroll controls | Lets you move around your project by using the left and right buttons or dragging the Scroll Bar. |
9 — Timeline ruler | Helps you determine clip and project length by displaying the project's timecode increments in hours:minutes:seconds:frames. |
10 — Video Track | Contains videos, photos, graphics, and transitions. Note that in HTML 5 mode, you can also have a Background Track. |
11 — Overlay Tracks | Contains overlay clips, which can be video, photo, graphic, or color clips. Note the HTML 5 projects also have overlay tracks. |
12 — Title Track | Contains title clips. |
13 — Voice Track | Contains voice-over clips. |
14 — Music Track | Contains music clips from audio files. |
