Adding titles with the Subtitle Editor
The Subtitle Editor lets you add titles to video or audio clips. Easily add on-screen narration to slideshows or song lyrics to music videos. Use timecodes to match subtitles to clips precisely when adding subtitles manually. You can also add subtitles automatically using Voice Detection for more accurate results in less time.
To launch the Subtitle Editor
1 Select a video or audio clip in the Timeline.
2 Click the
Subtitle Editor button

.
The Subtitle Editor dialog box appears.
You can also launch the Subtitle Editor dialog box by right-clicking a selected video or audio clip in the Timeline and choosing Subtitle Editor.
To add subtitles manually with the Subtitle Editor
1 In the Subtitle Editor dialog box, drag the Scrubber or play the video to the part where you want to add titles.
2 Using the playback controls or manual scrubbing, click the
Mark in 
and
Mark out 
buttons to define the duration of each subtitle.
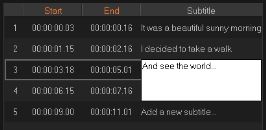
Each subtitle segment manually added will appear in the Subtitle list.
Note: You can also click the
Add a new subtitle button

to add a subtitle segment on the current location of the scrubber. If you click this button while the scrubber is on an existing subtitle segment, the program will seamlessly create an end point of the existing subtitle segment and the start point of a new subtitle segment.
Click the
Waveform view button

to display the audio waveform of the video clip. This is helpful in determining areas that have significant audio levels.
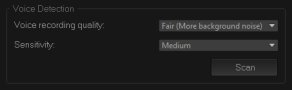
To add subtitles automatically with the Subtitle Editor
1 In the Voice Detection area, select settings in the Voice recording quality and Sensitivity drop-lists that correspond to the characteristics of the audio quality in your video.
2 Click Scan.
The program will automatically detect subtitling segments based on audio levels.
The subtitle segments are added to the Subtitle list.
Note: Voice Detection will be activated only if your video clip has audio.
For better voice detection results, it is best to use videos with clear speech and less background noise. This feature works best for video tutorials, speeches and video presentations.
To import subtitle files using the Subtitle Editor
1 Click the
Import subtitle file button

and browse for subtitle files that you want to import.
2 Click Open.
The selected subtitles appear in the Subtitle list.
All subtitle segments previously added manually or automatically, along with its properties, will be replaced by the selected subtitle files.
To edit subtitles by using the Subtitle Editor
1 For each subtitle in the Subtitle list, click the default text to activate the text box and type the text you want. Click outside the text box when you finish editing the text.
Repeat this step for all subtitle segments.
2 You can further customize titles in your project by using the following options:
Part | Description |
| Delete selected subtitles — Deletes the selected subtitle segment |
| Join subtitles — Merges two or more selected subtitles |
| Time offset — Introduces timing offsets for the entry and exit of subtitle segments |
| Text Options — Launches a separate dialog box where you can customize the font attributes, style and position of subtitles |
3 Click OK.
All segments in the Subtitle list will appear on the Title Track in the Timeline.
To save subtitle files using the Subtitle Editor
1 Click the
Export subtitle file button

and browse for the path where you want to save the subtitle file.
2 Click Save.