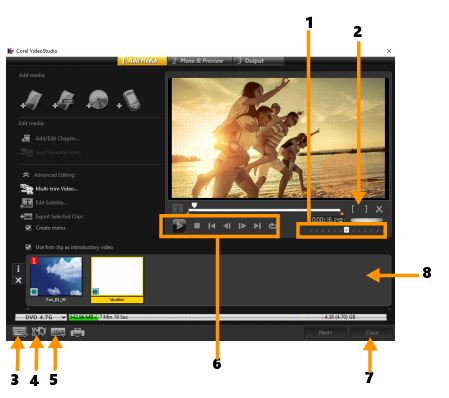
Part | Description |
1 — Jog Slider | Lets you jump to specific scenes. |
2 — Mark-in/Mark-out | Sets a preview range in the project, or sets the start and end points for trimming a clip. |
3 — Settings and options | Lets you access the Preferences dialog box and the Disc Template Manager. |
4 — Project Settings | Lets you determine how your movie project is rendered when you preview it. |
5 — Change display aspect ratio | Lets you select between 4:3 and 16:9 aspect ratios. |
6 — Navigation panel | Provides buttons for playback. |
7 — Close button | Closes the Create Disc dialog box and opens the Save As dialog box. |
8 — Media Clip List | Displays the added media clips as thumbnails. |
 on the disc format button indicates that the disc project has been saved. Click the previously selected disc format button to continue the disc output process. You can also edit the disc project at a later time. Click File > Open Project and select your saved VideoStudio Pro project file (*.vsp).