Using the Options panel in the Edit workspace
The Options panel in the Edit workspace allows you to modify the media, transitions, titles, graphics, animation, and filters that you add to the Timeline. The number of tabs and controls available depends on the type of media that you select. For example, if you select a video clip, and click Options in the Library panel, two tabs display: Video and Attribute.
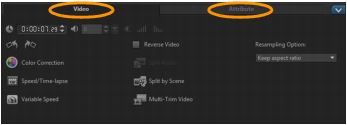
Video: Video tab
• Video Duration — Displays the duration of the selected clip in hours:minutes:seconds:frames. You can trim the selected clip by changing the clip duration.
• Clip volume — Allows you to adjust the volume of the audio segment of your video.
• Mute — Silences the audio segment of your video without deleting it.
• Fade-in/out — Gradually increases/decreases the volume of the clip for a smooth transition. Select Settings > Preferences > Edit to set the fade-in/out duration.
• Rotate — Rotates the video clip.
• Color Correction — Allows you to adjust the hue, saturation, brightness, contrast, and gamma of the video clip. You can also adjust the White balance of the video or photo clip or make auto tone adjustments.
• Speed/Time-lapse — Allows you to adjust the playback speed of your clip and apply Time-lapse and Strobe effects.
• Variable Speed — Allows you to adjust the playback speed of a clip at different intervals.
• Reverse video — Plays the video backward.
• Split Audio — Allows you to separate the audio from a video file and place it on the Voice Track.
• Split by Scene — Splits a captured DV AVI file based on the shooting date and time, or the changes in video content (i.e., motion change, camera shifting, brightness change, etc.).
• Multi-Trim Video — Allows you to choose desired segments from a video file and extract them.
• Resampling Option — Allows you to set the aspect ratio for the video.
Photo: Photo tab
• Duration — Sets the duration of the selected image clip.
• Rotate — Rotates the image clip.
• Color Correction — Allows you to adjust the hue, saturation, brightness, contrast, and gamma of the image. You can also adjust the White balance of the video or image clip or make auto tone adjustments.
• Resampling Option — Lets you modify a photo’s aspect ratio when a transition or effect is applied.
• Pan & Zoom — Applies the Pan & Zoom effect to the current image.
• Presets — Provides various Pan & Zoom presets. Choose a preset from the drop-list.
• Customize — Allows you to define how to pan and zoom the current image.
Color: Color tab
• Duration — Sets the duration of the selected color clip.
• Color Picker — Click the color box to adjust the color.
Attribute tab
• Mask & Chroma Key — Allows you to apply overlay options such as mask, chroma key, and transparency.
• Alignment Options — Allows you to adjust object position in preview window. Set the option through the Alignment Options pop-up menu.
• Replace last filter — Allows the last filter applied to a clip to be replaced when you drag a new filter onto the clip. Clear this option if you want to add multiple filters to your clips.
• Applied filters — Lists the video filters that were applied to a clip. Click

or

to arrange the order of the filters; click

to remove a filter.
• Presets — Provides various filter presets. Choose a preset from the drop-list.
• Customize Filter — Allows you to define the behavior of the filter throughout the clip.
• Direction/Style — Allows you to set the direction and style of entry/exit of the clip. This can be set to static, top/bottom, left/right, top-left/top-right, bottom-left/bottom-right.
As for the style, you can set direction of entry/exit of clips through: Rotate before/after pause duration and Fade in/out motion effect.
• Distort clip — Allows you to modify the size and proportions of the clip.
• Show grid lines — Select to display the grid lines. Click

to open a dialog box where you can specify settings for the grid lines.
• Advanced Motion — Opens the
Customize Motion dialog box which allows you to customize the motion of overlays and titles. For more information, see
Customizing motion.