Creating advanced menus
Advanced menu templates are made up of three separate layers for background settings, title menus, and chapter menus. You can edit menu objects in the currently selected layer.
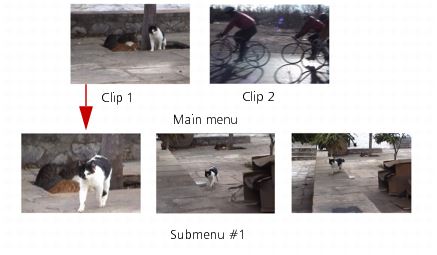
The illustration below shows the structure of a disc menu.
In this example, Clip 1 has three chapters, so when you click the Clip 1 video thumbnail, it jumps to submenu #1. If you look at Clip 2, it has no chapters assigned to it, so when you click Clip 2, the video starts playing from the beginning.
To add a title menu
• Click Advanced Settings in the Edit tab and select Add Title Menu.
To add chapter menus
• Click Advanced Settings in the Edit tab and select Create Chapter Menu.
To show the menu thumbnail numbers
• Click Advanced Settings in the Edit tab and select Show Thumbnail Number.
To create a menu template:
1 Click Customize in the Edit tab of the 2 Menu & Preview page. The Customize Menu dialog box appears.
2 Choose from the following options:
• Set the background music — Lets you choose an audio file to be used as background music.
• Set the background — Lets you choose an image or a video file to be used as background image or video.
• Font Settings — Lets you apply text attributes.
• Pan & Zoom — Lets you apply pan and zoom effects.
• Motion Filter — Lets you apply motion effects.
• Menu In/Menu Out — Lets you apply menu motion effects.
3 In the drop down menu, select Frame, Navigation Button, or Layout to display the associated preset thumbnails. Double-click a thumbnail to apply it.
Note: You can also resize, distort, rotate, and move menu objects in the Preview Window.
4 Click Add to Menu Template to add the template to the Favorites folder.
Note: When working in the Customize Menu dialog box, use the Font dialog box to accurately resize text. The Font dialog box can also be launched by right-clicking the text and selecting Font Attributes.