Burning your project onto a disc
This is the final step in the disc creation process. You can burn your movie to a disc, save it to a folder on your hard drive, or create a disc image file so that you can burn the movie at a later time.
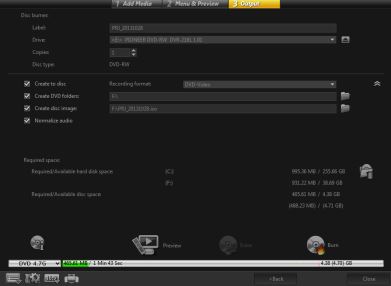
Burning options
• Disc burner — Specifies the settings for your burning device.
• Label — Enables you to enter a volume name for the Blu-ray Disc/DVD. The label can contain a maximum of 32 characters.
• Drive — Selects the disc burner that you want to use to burn the video file.
• Copies — Sets the number of disc copies to burn.
• Disc type — Displays the output disc format for the current project.
• Create to disc — Allows you to directly burn your video project onto a disc.
• Recording format — Select DVD-Video format to use the DVD industry standard. To quickly re-edit your disc without copying the file to the hard drive, select DVD-Video (fast re-editable) which still complies with the industry standard and has very high compatibility when working with set-top home DVD players and computer DVD-ROM.
• Create DVD folders — This option is only enabled when the video file being created is a DVD-Video. The files created are in preparation for burning the video file to an AVCHD or Blu-ray Disc. This also allows the user to view the finished disc folders on the computer using a disc playback software like Corel WinDVD.
• Create disc image — Select this option if you plan to burn the video disc several times. By selecting this option, you don't have to generate the file again when you want to burn the same video disc. This option is only available for DVD-Video and disabled for AVCHD, and Blu-ray Disc projects.
• Normalize audio — Different video clips may have different audio recording levels when created. When these video clips are put together, the volume may vary greatly. To make volume levels consistent between clips, the Normalize audio function evaluates and adjusts the audio waveform of the whole project to ensure a balanced audio level throughout the video.
• Erase — Deletes all the data on a rewritable disc.
• Burning Options — Adjusts the advanced output settings for burning your project.
• Delete temp files — Removes all unnecessary files in your working folder.
• Burn — Begins the recording process.
• Required space — Serves as a reference when you burn your projects. These indicators help determine if you have sufficient space to successfully burn your project onto the disc.
• Required/Available hard disk space — Displays the space needed by the project and the available hard drive space.
• Required/Available disc space — Displays the space needed to fit the video file on the disc and the space that is available for use.
To burn your movie onto a disc
1 Click Next after you preview your project.
2 Click Show more output options and enable one or more of the following options:
• Create DVD folders — Creates DVD folders in a specified location.
• Create disc image — Creates an ISO image file of the DVD.
• Normalize audio — Evens out irregular audio levels during playback.
Note: Create disc image is disabled for AVCHD and Blu-ray Disc projects.
3 Click More settings for burning.
The Burning Options dialog box appears. Define additional burner and output settings and click OK.
4 Click Burn to start the burning process.
Click OK when prompted that the task is done.
5 Click Close to save your work automatically and return to the Corel VideoStudio Editor.