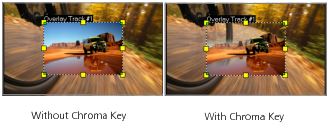
Blending overlay clips with the background
You can specify how overlay clips blend with the background by using different “Key” options:
• Chroma Key — used to remove a specific color from an overlay clip. For example, if you capture a subject against a “green screen” background or cover part of a subject with green, Chroma Key can be used to remove the green. You can then place the subject on another background to change the surroundings or create a special effect such as the appearance of a hovering object.
• Gray Key — adjusts the transparency of the overlay clip based on tone (light/dark values), rather than color.
• Multiply — multiplies the value of the overlay colors with the underlying colors and divides by 255. The result is darker than the original colors. White has no blend effect; black always blends to black. You can use the Blend/Opacity slider to adjust the transparency.
• Add Key — adds the color values of the overlay clip with the values of the underlying colors. You can use the Blend/Opacity slider to adjust the transparency.
The settings available depend on the type of key that you choose. Experiment with the settings to achieve the look you want.
To blend an overlay clip with the background by using Key settings
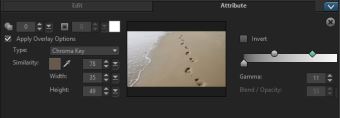
1 Click Mask & Chroma Key in the Attribute tab.
2 Enable the Apply Overlay Options check box, then choose one of the following settings from the Type drop-list:
• Chroma Key
• Gray Key
• Multiply
• Add Key
If you choose
Chroma Key, use the eye dropper tool

to pick a color in the Preview Window and adjust the color similarity value (to the right of the eye dropper tool). The transparency effect appears in the Preview Window.
3 Experiment with any of the following settings to achieve the results you want (availability of controls depends on the Type you select):
• Gamma — affects image contrast and can be used to lighten (move control to the right) or darken (move control to the left) the overall image
• Min — can be moved to the right to darken the image’s lightest pixels
• Max — can be moved to the left to lighten the image’s darkest pixels
• Cutoff — can be moved to the right to set a new black point for the image (more black in the image).
• Threshold — can be moved to the left to set a new white point for the image (more white in the image).
If you choose Multiply or Add Key, you can also adjust the Blend/Opacity setting to adjust transparency.
You can crop an overlay clip by adjusting the Width and Height values.
You can invert the blend settings by enabling the Invert check box.